“Cooking is like love; it should be entered into with abandon or not at all.” ― Julia Child
Saturday, July 16, 2011
"Challah" Back Girl!
Sorry! I can't resist a bad pun!
I find myself stuck at home this Saturday morning. My husband's car is in the shop and he needed to use mine to get to work (yes, he works on a Saturday, everything about this post is not Kosher for Shabbat). The weather is unseasonably cool, so I got up early and went for a run. Came home. Ate breakfast. Took the dog out. Now what? So I got to thinking, I have a whole day to kill at home. What can I do that takes almost all day and I can only do from home? Bake bread! Duh!
After the success of my bagels I was feeling ambitious and really wanted to attempt bread. Of course not just any bread. I have to keep with my Jewish homemaker theme and make challah bread. Challah bread is a traditional Jewish bread that is served with Shabbat dinner (the Sabbath). Jews making challah bread dates back more than 4,000 years where it is mentioned in the book of Leviticus & things pertaining to Moses. It is usually a braided loaf, but is a braided round on the high holidays. It can contain raisins but I've always preferred it plain with a shmear of butter. It is similar to brioche or any type of egg bread. Here is a bit more about this history of Challah if you are interested History of Challah. It's history could really warrent its own post.
It has been so hot here for the past week, I haven't wanted to turn on the oven, but with temperatures in the low 70s this morning, I figured now was as good a time as any. I came across this recipe for Challah Bread from my favorite food blog www.smittenkitchen.com. Needless to say, if Jews are going to make it, they usually do it Friday before sundown (or buy it at Publix :) ) not Saturday morning. Anyway, it turned out delicious and even your average shiksa can do it! Keep reading for the recipe I followed.
Ingredients:
1 1/2 packages active dry yeast (1 1/2 tablespoons)
1 tablespoon plus 1/2 cup sugar
1/2 cup olive or vegetable oil, plus more for greasing the bowl
5 large eggs
1 tablespoon salt
8 to 8 1/2 cups all-purpose flour*
* I used bread flour here. Not sure if it makes any difference.
Time: about 1 hour, plus 2 1/2 hours’ rising
Yield: 2 loaves
Making challah bread is very similar to making other breads. Combine the yeast, warm water, and 1 tablespoon of sugar in a mixing bowl. When yeast and sugar dissolve, whisk in oil.
Then mix in eggs one egg at a time). Add the rest of the sugar and the salt. Mix to combine.
Add in flour gradually. Stop mixing when the dough forms a ball (or giant glob).
Kneading time! This time around I found that my trusty Kitchen-Aid stand mixer struggled with this task. While she so effortlessly kneaded the bagel dough, I found that with this dough, I had to take it out and kneed it myself. It was just too much for the mixer to handle on her own. Kneading is not as intimidating as it first appears. It is rather therapeutic. Turn the dough out on a floured surface and kneed the dough until it is smooth. Then return it to a greased bowl, cover it and let it rise for an hour or so in a warm place (I used the warming drawer on my oven set to low).
After an hour, punch dough down, recover, and let it rise for another 1/2 hour.
Braiding
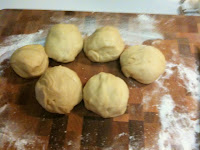
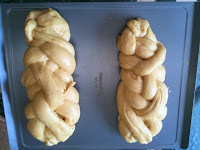
At this point you are ready to braid the dough, if you are so inclined. You are going to have enough dough to make two loaves. To make a six braided challah, divide the dough into six pieces and roll each piece into a ball. Roll each ball out into long strands of the same length- about 12in long and about 1 1/2 in wide (like the snakes you used to make with play dough back in preschool). Then, pinch the tops of the strands together. Here is where it gets a bit tricky Move the outside right strand over 2 strands. Then take the second strand from the left and move it to the far right. Take the outside left strand and move it over 2. Move second strand from the right over to the far left. Start over with the outside right strand. Continue this until all strands are braided. For a straight loaf, tuck ends underneath. For a circular loaf, twist into a circle, pinching ends together. Make a second loaf the same way. Place braided loaves on a greased cookie sheet with at least 2 inches in between. I must admit this braiding process takes practice. I think I would watch some YouTube tutorials beforehand next time. **
Beat the remaining egg and brush over the loaves. Give each loaf two coats of egg wash if possible so it gets that lacquered look when it bakes. Patience again. The bread must now rise for 1 more hour. You can do this in the fridge or where you had it before. Some experienced challah bakers believe that refrigerating during any of the 3 rises can enhance the flavors. Its totally your call, but if you do refrigerate, let it come to room temp a bit before baking.
2nd & 3rd rise
Bake at 375 in the middle rack for 30-40 minutes. Cool on a rack.
What do you do with two loaves of challah bread? Eat one immediately. Make french toast with the other one tomorrow (or bread pudding, or freeze it, the possibilities are endless).
**There are many YouTube challah braiding tutorials that I watched afterwards. Click on the link to view Braiding a Six Strand Challah video.
Subscribe to:
Post Comments (Atom)


OMG! Can I come over and have some? I love challah, and these look beautiful!
ReplyDelete